
")
The Office Deployment Tool is a free utility from Microsoft that helps users, IT admins, and businesses install Office in a more flexible way. Instead of clicking through a normal setup wizard, this tool gives you more control over how Office is installed, which version you choose, which apps you include, and how updates are managed. Understanding the Office Deployment Tool is important if you want to save time, avoid installation errors, and manage multiple Office installations across different computers.
What Is the Office Deployment Tool?
The Office Deployment Tool, often called ODT, is a small program made by Microsoft that allows you to customize the installation of Microsoft Office. Normally, when you install Office 365 or Office 2021, you just click “Install” and it downloads everything with the default settings. That’s fine for a single user, but if you are an IT professional or even just someone who wants more control, this basic installer can feel very limited. The Office Deployment Tool solves this problem by giving you the ability to create a configuration file that tells Office exactly how to install. With this tool, you can choose which Office applications you want (like Word, Excel, or PowerPoint), which language to use, which update channel to follow, and even where to install it from. This is very helpful when you need Office installed on many computers, because instead of going through the setup one by one, you can create a single setup plan and run it everywhere.
Why Use the Office Deployment Tool?
There are many reasons why you should use the Office Deployment Tool instead of just downloading Office the normal way. First, it saves time and bandwidth. If you need to install Office on several computers, you don’t want each one downloading gigabytes of files from the internet separately. With ODT, you can download the installation files once and then deploy them everywhere. Second, you get more control. You can decide which apps to include. For example, maybe you want only Word and Excel but not Access or OneNote. With the normal installer, you don’t have this choice. Third, it helps businesses and schools. IT admins can set up Office installations exactly how they want, push updates on their schedule, and make sure every computer has the same version. This prevents problems where one person is on an old version and another is on a new one. Finally, it makes troubleshooting easier. Since you’re controlling the process with a configuration file, you can adjust things quickly if an error happens.
How to Download the Office Deployment Tool
Getting the Office Deployment Tool is simple, and it only takes a few minutes. Microsoft makes it free to download, and you can find it directly on their official site. Here is a step-by-step guide on how to download the tool correctly.
Go to Microsoft’s Website
The safest and easiest way to get the Office Deployment Tool is from the official Microsoft Download Center. Just open your browser and search for “Office Deployment Tool Microsoft Download.” Make sure you are clicking on the real Microsoft site and not a third-party site, because downloading from unofficial places can be risky.
Click Download
Once you are on the official page, you’ll see a big button that says “Download.” Click on that, and the setup file for the Office Deployment Tool will start downloading to your computer. It’s a small file, so it should only take a few seconds or maybe a minute depending on your internet speed.
Open the File
After the file is downloaded, go to your Downloads folder and open it. The file is usually called “officedeploymenttool.exe.” When you double-click it, it will ask you where to extract the contents. This tool doesn’t install like a normal program—it just extracts some files, including a setup.exe and some sample configuration files. Once you extract them to a folder, you are ready to start using the Office Deployment Tool.
How to Set Up the Office Deployment Tool
Setting up the Office Deployment Tool is not complicated, but it does require a little attention to detail. After you extract the files, you’ll see that one of the most important pieces is the setup.exe file. This is the main file that runs the tool. Along with that, Microsoft provides a few sample XML configuration files. These are templates you can use to create your own installation setup. To set up the tool properly, you should first decide what kind of Office installation you need. Do you want Microsoft 365 Apps for Enterprise, or do you want a specific version like Office 2019 or Office LTSC 2021? Do you need 32-bit or 64-bit? Which language do you want? Once you know these answers, you’ll edit the configuration file to match. Then, when you run the tool with that configuration file, it will install Office exactly as you’ve planned.
How to Create the Configuration File (The Easy Way)
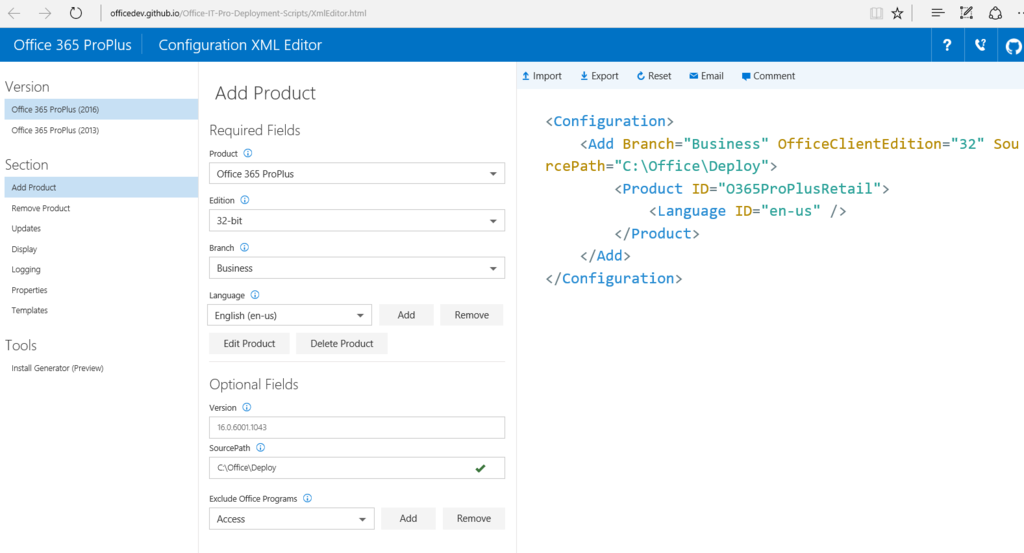
The configuration file is the heart of the Office Deployment Tool. This file, usually written in XML, tells the tool how to install Office. While you can write it manually, Microsoft provides an easier way with the Office Customization Tool, which is a web-based helper. By visiting the Microsoft 365 Apps admin center, you can use a simple interface to select options like the version of Office, the update channel, the apps you want, and the languages you need. When you’re done, it will generate the XML file for you. All you have to do is download that file and save it in the same folder as your setup.exe. This method is perfect if you don’t want to learn XML coding. With just a few clicks, you can create a fully customized configuration file without worrying about syntax errors. Once you have the file, you’re ready to move on to the actual installation.
How to Use the Office Deployment Tool to Install Office
Now comes the main part: using the tool to install Office. Unlike the regular installer, you won’t just double-click and watch it work. Instead, you’ll run it from the Command Prompt. Don’t worry—this sounds more difficult than it is. It’s actually just a few commands.
Open the Command Prompt
First, open the Command Prompt on your computer. You can do this by pressing Windows + R, typing “cmd,” and pressing Enter. It’s best to run it as administrator, so right-click the Command Prompt and choose “Run as administrator.”
Run the Tool with Your Config File
Next, you need to go to the folder where your setup.exe and configuration XML file are stored. You can do this by typing cd followed by the folder path. Once you’re there, you’ll run a command like this:setup.exe /configure config.xml
Here, “config.xml” is the name of your configuration file. This command tells the tool to read the instructions in the XML and start installing Office exactly how you set it up.
Let It Install
Once the command is running, the tool will begin downloading and installing Office. Depending on your internet speed and the options you selected, this may take some time. Just let it run and avoid closing the Command Prompt. When it’s finished, Office will be installed on your computer with your chosen settings. You can then open Word, Excel, PowerPoint, or whichever apps you selected, and start using them right away.
Office Deployment Tool vs Manual Install
You might be wondering, “Why should I bother with all this if I can just download Office and click Install?” The answer is control and efficiency. A manual install works fine if you’re just installing Office for yourself and don’t care about which apps or languages are included. But the Office Deployment Tool is better when you want to customize the installation, save bandwidth, or install on multiple devices. For businesses, it’s almost a requirement because it allows IT teams to deploy Office in bulk with consistent settings. For personal users, it’s helpful if you want to avoid installing apps you don’t need. Simply put, the manual install is quick and simple, but the Office Deployment Tool is smarter and more powerful.
The Bottom Line
The Office Deployment Tool is a powerful yet easy-to-use solution for anyone who needs more control over how Microsoft Office is installed. Instead of being stuck with the default installer, you can decide exactly what gets installed, how it’s updated, and where it comes from. This tool is especially valuable for IT admins, schools, and businesses that need to manage multiple installations, but even regular users can benefit from its flexibility. The steps may look technical at first—downloading the tool, creating a configuration file, and running commands—but once you try it, you’ll see that it’s actually straightforward. Best of all, it ensures that your Office installation is clean, customized, and efficient. So whether you are a beginner or an experienced IT professional, learning to use the Office Deployment Tool is a smart move that will save time and reduce headaches.